Stage 1: Start Here
Locations: Empty Parking Lot
Length of Lessons: 30-45 minutes
Length of Stage: As long as it takes! See the Stage 1: Checklist article for help on determining when your teen is ready to move on to more tasks. However, most students become proficient in the Stage 1 tasks within 2-4 weeks of practice.
Your first behind-the-wheel lessons should be short and repetitive.
![]()
Think about all of the tasks you perform automatically when you get behind the wheel: putting on your seatbelt, checking your surroundings, removing the parking brake (yes, you should always set your parking brake when you park your car), adjusting your seat, checking your sideview and rearview mirrors. And this is before you even turn the ignition.
You do these quickly and without much thought. However, these are not automatic to a new driver. The only way to make this automatic is to create the habit by methodically performing them during each lesson.
Begin each lesson by reviewing important pre-drive tasks

By the time your teen has completed the necessary work prior to their first behind-the-wheel lesson, they’re going to be itching to start the car and begin driving around the parking lot.
You know your teen better than we do. So, perhaps for their very first lesson, you may want to skip some of these pre-drive tasks and let them work out some of their excited energy.
Allowing them to drive slowly around an empty parking lot will burn off some of their adrenaline and make it easier for them to focus on the pre-drive tasks. It’s going to be difficult to get your teen to listen to 15-20 minutes of pre-drive instruction if they’ve never pressed the accelerator.
We’re not condoning that you skip this information, rather suggesting you may have an easier time teaching them this information after you’ve given them a little taste of driving.
For the first few weeks, it’s important to perform the following tasks prior to entering the car:
- Check the area around the outside of the car for broken glass and other hazards. Try the chalk lesson for an eye-opening view of how much area directly around your car is obscured when sitting in the driver’s seat.
- Quickly check tires for proper inflation.
- Review important under-the-hood elements. While you don’t need to pop the hood every time you drive, you should familiarize your teen with the basic elements that make your car go.
You should also perform the following adjustments after entering the car (but prior to starting the car):
- Seat and steering wheel adjustments. Your teens arms should not be fully extended when gripping the wheel. They need to be slightly relaxed. When gripping the wheel at 10 and 2, their arms should be parallel with the ground. You don’t want them reaching up or down. Make sure their legs are not fully outstretched. There should be a slight bend in their knees.
- Learn the BGE mirror setting. The BGE mirror setting stands for ‘Blindspot and Glare Elimination’ and it’s the best way to configure your side view mirrors. Because this setting was introduced in 1995, many of today’s drivers are not aware that their mirrors should be set in this way. We suggest that you review our BGE article and test the setting yourself. You’ll find that it eliminates your blindspots completely. It takes a driver who is accustomed to traditional mirror settings approximately 1-2 weeks of driving to become comfortable with the BGE setting. We completely endorse the BGE setting and suggest you teach this mirror setting to your teens.
Starting the car
- Learning warning lights and symbols. It’s important that your teen begins to learn what all of the lights on the dashboard mean. Obviously, you can teach this information over a period of a few weeks. However, make sure they know what they all mean before your first road/street lesson.
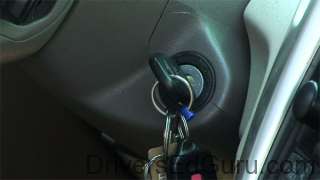
- Starting procedure:
- Put your foot on the brake.
- Remove the parking brake.
- Turn the key (but not too far or the engine will grind).
- Identify “operating control devices”: This is a fancy way to say “things that do stuff”. For instance: the turn signal, gear shift, steering wheel, and lights are operating control devices. Obviously, your teen does not need to memorize all of these functions for driving around the parking lot. But, again, they must be experts in using these devices prior to your first road lesson.
Driving around an empty parking lot
![]()
Throughout your first week of behind-the-wheel practice, you should remain in an empty parking lot.
Simply drive at 10-15 mph around the parking lot. Give them clear instructions of what you’d like them to do.
For instance: “Drive until we’re even with that tree and then start slowing down and try to come to a stop even with the end of that building.”
Once they get the hang of this, start incorporating more tasks. For instance, ask them to turn on their turn signal while driving in a straight line. Ask them to turn on their windshield wipers. Try to get them comfortable using these other control devices in a safe, collision-free environment.
You should work on the following skills in the parking lot:
- Slowing moving forward
- Stopping smoothly
- Making right and left turns
- Driving in reverse at slow speeds
Future lessons
In the next set of lessons, we will discuss tips for starting and stopping smoothly, making turns, steering methods, and more.
Continue on to The Chalk Lesson
